

flutterとfirebaseに慣れるために以下の記事を参考にしてアプリの開発を行いました。
https://rightcode.co.jp/blog/information-technology/flutter-firebase-bulletin-board-app-make
環境構築
以下の記事と公式ドキュメントを参考に環境を構築する。
- Kboyさんが描いてる記事→ https://zenn.dev/kboy/books/ca6a9c93fd23f3/viewer/5232dc
- 日本語版のflutter公式ドキュメント→ https://flutter.ctrnost.com/install/
アプリケーション開発を始める
vscodeにてStudioProjects直下のあなたのプロジェクトディレクトリを開きます。
libフォルダの中にmain.dartというファイルがあるので開いてみる。
基本的にアプリケーションのコードはこのファイルに書くと思う。
main.dartを以下のように書き換えてみる。
import 'package:flutter/material.dart';


void main() {
  runApp(const MyApp());
}


class MyApp extends StatelessWidget {
  const MyApp({Key? key}) : super(key: key);


  // This widget is the root of your application.
  @override
  Widget build(BuildContext context) {
    return MaterialApp(
      title: 'Flutter Demo',
      // 右上のdebugタグを外すためのやつ
      debugShowCheckedModeBanner: false,
      theme: ThemeData(
        primarySwatch: Colors.yellow,
      ),
      home: const MyHomePage(title: '掲示板デモアプリ'),
    );
  }
}


class MyHomePage extends StatefulWidget {
  const MyHomePage({required this.title}) : super();


  final String title;


  @override
  State<MyHomePage> createState() => _MyHomePageState();
}


// ここから書き換えてみました
// Stateを継承しているウィジェットが見た目の部分のビルドを行っています
class _MyHomePageState extends State<MyHomePage> {


  @override
  Widget build(BuildContext context) {
    return Scaffold(
      appBar: AppBar(
        title: Text(widget.title),
        actions: [
          IconButton(
            icon: Icon(Icons.edit),
            onPressed: () {
              Navigator.of(context).push(MaterialPageRoute(builder: (context) {
                return PostPage();
              }));
            },
          ),
        ],
      ),
      body: Center(
        child: Text(
          "ここにみんなの投稿が流れる"
        ),
      ),
    );
  }
}


class PostPage extends StatefulWidget {


  @override
  _PostPagePageState createState() => _PostPagePageState();
}


class _PostPagePageState extends State<PostPage> {


  TextEditingController _textEditingController = TextEditingController();


  @override
  Widget build(BuildContext context) {
    return Scaffold(
      appBar: AppBar(
        title: Text("投稿画面"),
      ),
      body: Center(
        child: TextField(
          controller: _textEditingController,
          enabled: true,
          maxLength: 50, // 入力数
          maxLengthEnforced: false, // 入力上限になったときに、文字入力を抑制するか
          style: TextStyle(color: Colors.black),
          obscureText: false,
          maxLines:1 ,
          decoration: const InputDecoration(
            icon: Icon(Icons.speaker_notes),
            hintText: '投稿内容を記載します',
            labelText: '内容 * ',
          ),
        ),
      ),
    );
  }
}
command+sで保存したら、以下のような画面がエミュレーター上に表示されます。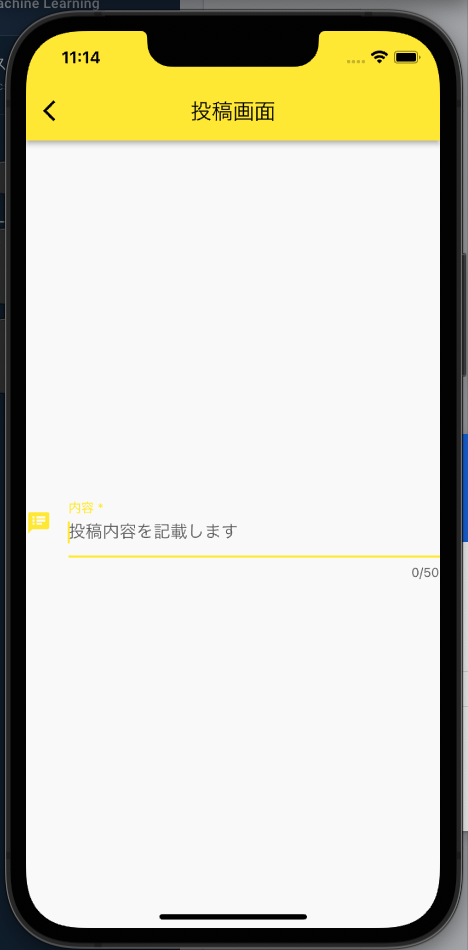
いい感じやな
cloud firebaseの構築で行き詰まった点
先程、紹介した記事の通りにfirebaseの構築とcloud firestoreの設定をしていく。
この辺の設定で1箇所だけつまづいた点があったのでメモっておく。
それが、iosバンドルIDと呼ばれるものの存在である。
IOSバンドルIDとは、アプリケーションを識別するために使用される一意な値のようです。
このIDをcloud firestore側に登録しておくことによって、あなたのflutterプロジェクトとcloud firestoreを紐づけることができます。
今回作成したflutterアプリのプロジェクトのもバンドルIDが存在していますので、確認してみましょう。
確認する方法を以下に示します。
- Xcodeを立ち上げる
- StudioProjects/your_project/ios/Runner.xcodeprojを開く(StudioProjectsフォルダは、Android Studioにてプロジェクトを作成した時に生成されるフォルダ)
- General をクリックする
- Bundle Identifierを参照(ここにバンドルIDが載っています)
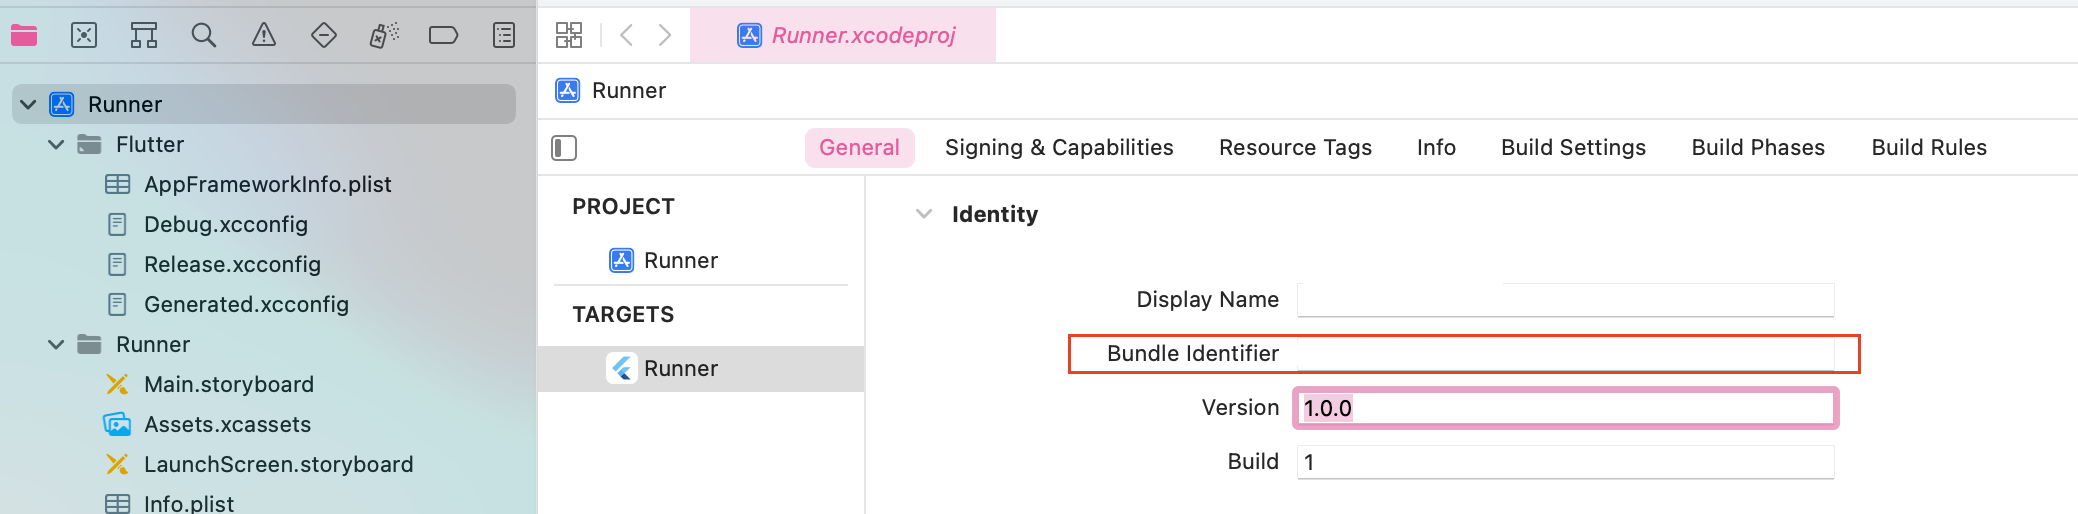
確認したバンドルIDをcloud firestoreに保存します。
今回の記事はここまでとします。
最新の記事


.png&w=1920&q=75)


© 2021 powerd by UnReact